
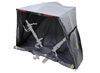
Carry 2 e-bikes on the back of your vehicle with this enclosed, V-shaped rack. Included PVC cover keeps water and road grime off your bikes and has LEDs for increased safety and visibility. Platform slides out for access to your rear cargo area.
Features:
Specs:
Videos are provided as a guide only. Refer to manufacturer installation instructions and specs for complete information.
Hi, everyone. It's Evangeline here at etrailer, and today we're gonna take a look at the Lets Go Aero V-Lectric 3.0 bike rack. This is gonna be the enclosed bike carrier that has a heavy-duty bike rack with an add-on cargo bag. We're gonna take a look at some of its features, here etrailer.com. Now, as I was working on this bike rack, as people we inchesre walking by, I heard constantly all day, "What is that" Because it does look a lot different from some of the other bike racks that you might see on the road, and that's because it's designed to fill a very specific need. If you are looking to protect your bikes, whether they're heavy electric bikes, or just some bikes that you really invested a lot of money into, this is gonna be the rack that provides almost the most coverage on the road that you will see.
But not only will it provide coverage, but will add some extra features there too for versatility. You are able to slide this rack out if you need more space or clearance for your cargo area, or if you need to go up the ladder of your motorhome. You're also able to carry around heavier bikes of up to 60 pounds. All of these work together to make a bike rack that not only protects your bikes, but allows you to use it in different situations. What I have here is a kit.
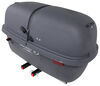
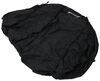
So we have the V-Lectric bike rack plus the bike pack cover. If you want them kitted together, you can do so here on our site, or you can purchase them separately in different parts. For example, some people may have the older version of this rack. You can easily get this cover to add onto it if you want that extra protection. I do recommend trying to get the kit right away though, because this cover is designed only for your Lets Go Aero V-Lectric rack, and that's because it utilizes different things, like struts on the side.
You have round poles to give structure. You also have custom cutouts for the wings of your rack, and you also have enough clearance for bikes of different shapes and sizes. But it is very important to double-check the measurements here on our product pages at etrailer.com to make sure that your bikes can fit within the dimensions of this rack. The steel frame is there for the support and the structure of your cover, but the cover itself is made of a PVC material. You also have other features here, like your reflective strip, which goes around the cover for visibility at night.
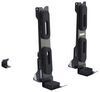
You also have a four-way wiring harness that is connected to these lights. These lights will mimic your brake lights, as well as your turning signals, because if you're gonna have a larger, bulky item at the back of your vehicle or your motor home, it would be very helpful for it to be visible to the people on the road behind you. All this will work together to protect your bikes from the elements, as well as all that dirt, rocks, and road grime that your vehicle will kick up. And instead of hitting the bikes, it will hit the cover. So my aunt and uncle, they have a fifth wheel that I got them a bike rack for, and that way they're able to carry their electric bikes on their long road trips. And that situation is where I see this bike rack most helpful. When you are traveling all over the country and you're in all types of situations, protecting your bikes from those different elements is very important. It's also helpful once you do arrive at the campsite, you can keep your bike stored, and they're not exposed to the sun and the UV rays. Now, when you do get your bikes on there, there is a little bit of extra work that you're gonna have to put into setting this rack up for your bikes. It's not very intuitive, and it's not a quick process. So hopefully I'll be able to guide you through that process, because once you get this configured for your bikes, then it's gonna go great from there. Lets Go Arrow utilizes wheel mount cradles, and they look a little different compared to the ones you might see on other racks. That's because they have cradles that focus on making sure your bike is level without having your bike sit on a platform. So you're gonna have four of these cradles, and you have to use at least three of them. To support your bikes, you have a bunch of different touch points on this rack. You have adjustable cradles that can go up and down in order to support your wheels, you have straps that go around your tire to keep your wheels in place, and you have foam pads just to protect your frame or your paint in case any part of your bike comes in contact with the rack. Some tips for loading your bikes. First, make sure that when you are carrying two bikes to have these chains facing away from the rack. The second tip is that when you are loading the farther bike, you can just go ahead and slide your rack out, and that will give you more clearance in the back to get your bike into place. And then the third tip is that you only need three of the cradles touching your bike. Four would be ideal, but the most important thing is that at least your front wheel should have the two cradles giving that support. What I do to make my adjustments, is that I loosen this wing nut, and this allows me to slide the cradle up and down. Once I have a position that I like, I just tighten it back down. The next thing I do is I actually remove the cradles for the bottom spots. To do that, you lift this lever up and you pull that straight cradle out. This gives you a little bit more clearance for focusing on getting your bike up onto the rack. This process may be a little bit trickier for your heavier bikes. So again, remember that while this bike rack can carry up to 60 pound bikes, the next question is if you can carry up to 60 pound bikes. So what I do is I grab the bike, I lift it up, and I just get it into position inside the cover and onto that first cradle. We're focusing on getting the front wheel up there. If I need to, I can rest the rear wheel on the rack, as I get myself situated up front. Once I'm happy with that positioning, I then pull the cover out of the way as I get that rear wheel up and onto the cradle, and then I fit the cover around it. Some good things to keep in mind is that you want the cradle resting in between the spokes. And once that's in place and you have your second bike there, you can make your other adjustments, watching out for handlebars, for seats, and for pedals. Now you can attach your bottom cradles. Ideally you'll want your bottom cradle underneath your wheel, providing some support there. In our case here, because of how the bikes fit, and because of the size of our bike, that just wasn't gonna be an option for us. So what we're gonna do is we're going to fit the cradle at a spot that touches the rim of our front wheel. And that way, when we use the strap to tighten it back down, this will provide that support of the front wheel, over here at the bottom, and prevent that from shifting back and forth. The process of getting your bike set up is gonna take a while the first time you do it, but hopefully you won't have to carry different types of bikes too often. And once you have your cradles in a position you want it, then it's gonna be smooth sailing from there. You also have some other things to help with your experience. You have a four-way wiring harness. Now there is a plug underneath the bag, but if you need to extend it out to reach your plug on your vehicle, an extension is included. You also have a cable lock included with this rack. The cable lock is a little strange, because you're designed to loop the lock around the frame of your bike and then feed the end of the cable through your cover. So once your cover is closed, you can then grab the end of that cable lock, fit it over your silent hitch pin, and then this is what you lock with the included lock. So in theory, works great to secure your bikes. In reality, once you need to get access to your bikes again, you're gonna have to undo this cable lock, feed it back through the hole, and that way you can undo the cable itself in order to get your bikes. What I personally do is I just use my own personal lock, and I secure that to the wings of the rack, and then I rely on the lock included with the bike rack to protect the bike rack. That silent hitch pin lock is actually an anti-rattle bolt, and you're gonna get two of these bolts. One to operate the slide-out, and the other to secure your rack into your hitch receiver. Once you remove this pin, you are able to slide the hole rack out. This is the Twin Two base. Lets Go Arrow uses the same base for a lot of their different products, from the Gear Space Cargo Box to the V-Lectric bike rack, like what we have here. And the way this is designed is you can slide your bike rack out to different distances. Those distances are affected by where you install your bike rack when you get it all assembled, as well as where you put your safety cable. So if you find that you need a lot of extra clearance, well there's a bunch of different things you can do while you're assembling everything, to make sure you get that clearance. This is often seen in sprinter vans or truck tailgates that need that extra space. So while I've been showing this bike rack, to all the different people walking by today, their reactions usually start with, "Wow, what's that," to "Oh, that's kinda strange," back to, "Okay, that's actually kinda cool." And that rollercoaster of emotions comes from the fact that it has a lot of features, but it requires a lot of work to fully utilize those features. So hopefully this video was able to guide you through what this bike rack is, how you could use it, but most importantly, how you can get your bikes into the rack, as well as into the cover. Because with all things being said, this is a pretty impressive rack. The main thing is that you have to make sure that your bikes can fit in there, and also that it fits your lifestyle. If you're the type of person that wants the most coverage to protect your investment of bikes, this is gonna do that for you. However, if your priority is something that is easier, or makes things easier to load your bikes up, or has a greater weight capacity, then there's other options. If you wanna stick with the Lets Go Arrow brand, there is a version of this bike rack that has a ramp. The ramp is great. The downside is the cover does not work with that bike rack. If you wanna go outside of the Lets Go Arrow brand, a good recommendation for you is the Saris MHS two-bike DUO kit. That one is a dual wheel mount rack with great weight capacity, and it's really easy to get your bikes on there. However, the MHS does not have the coverage that the Lets Go Aero bike rack offers. So the important thing is what are you looking for for your adventures, because chances are we have the solution for you here at etrailer.com. So today what we saw was the Lets Go Arrow enclosed bike carrier, the V-Lectric 3.0, here at etrailer. My name's Evangeline, and I hope you enjoyed the journey.


You Always have what I need and it’s in my hands Fast!
I think it’s a great product and easy to use assemble.
Heavy and well built rack. I have not used yet, but have not doubt that it will hold up.
This bike rack does what it says it will do. It's flexible, it's safe and it hold the weight it advertises. That all being said it's a real pain in the rear. I'm a big dude I can do all the lifting and shifting required to use it, but it's just a pain in the tail. The flexibility also causes it to shift in transit and more than once we have had the bikes shift into each other and scratch the frame.
Way too heavy & almost impossible to us e.
One of lower wheel cradles will not lock into place need to have this one cradle replaced please.
Over all I am happy with the bike rack it is sturdy well put together and easy to use. One exception the threaded pin for the 2" receiver on the truck, why is not a slip in pin instead it has spring nut?
This is a very heavy duty rack and my two 70 lbs e-bikes fit on great! It was also very easy to assemble.
these bikes are heavy tring to fit them on. the buttom wheels don't sit on the bar.
The rack is perfect for our e bikes which are large and quite heavy . Like that it’s rv rated, supports the bike securely and the ramp feature is a back saver.
Heavy duty! Too adjustable! Takes a while to get bikes loaded back to same exact way each time. Stopped using and bought different brand.
Arrived with a knob broken off during shipping. William responded promptly and shipped a replacement. Great product!!
Unit is very sturdy. It takes about 2-3 hours to assemble. The slide mechanism use a wax film to achieve low-friction movement. This could be better executed with a linear ball slide design to reduce movement. Locking mechanism would be sufficient to secure in place. Part 'AA' Cradle Housing is delivered in left and right hand designs. This is not explained during Step 10 assembly. Sort parts before assemble to get four of each design. No specific instructions are presented to locate 'N' Base on 'M' Slide Tubes. A guide for clearance calculations would be helpful.
Purpose of this product is to transport two eBikes weighing 65 pounds each. Lifting bikes onto rack is a two person job. Setting the rack into hitch is a two person job. In other words, this thing is heavy, so be careful with your back. I added a EcoHitch class III receiver (Item # 306-X7326) on my Kia Soul rated for maximum tongue weight: 300 lbs. Given that the rack weighs 75 pounds and two eBikes weigh 130 pounds, this rack is certified to carry the weight, even over rough roads.
I flat tow the Kia with invested $4,000 in eBikes, so the assurance for this racks justifies my purchase.
First this was the only ebike rack that we could find that was recommended for travel trailers or fifth wheels. Now that it has arrived I see why. Its heavy gauge metal and rated to hold 300 lbs.
We will be carrying 2 YOLO e-beach cruisers that go about 75 lbs each.
This rack is well worth the cost and is a quality product.
As designed it's rock solid. but it's difficult to use because the bikes are heavy and they have to fit perfectly on the posts which is hard to do. you sent me a conversion kit last year which was appreciated and it's easier to roll the bikes up and secure. However the ramp is flimsy and the metal thin. i believe there are similar, better designs available. i do appreciate your service which is very good and rare these days but the product is inferior as it is today. i would not purchase again.
It's a nice solid bike rack for heavy bikes. I bought it because it is travel trailer approved. But it's tough to line your bikes up the first time and it is extreemly heavy and it does not fold out of the way when attached to your hitch. If your not a strong person you should probably stay away from this rack. But, if you need a strong rack that is travel trailer approved, this is the rack for you. Sacrifice one thing for another.
We own 2 Lectric Lite ebikes, well below the weight limit of the Go Aero rack. After experiencing multiple breaks and ordering extra parts, we had over $1,000 invested in the Go Aero bike rack. We finally,after 4 months, scrapped the Go Aero rack, cut our losses and purchased a Yakima rack. The Go Aero rack is extremely difficult to use for the ebikes we own and don't recommend this rack.
Do you have a question about this Hitch Bike Rack?
Info for this part was:
At etrailer we provide the best information available about the products we sell. We take the quality of our information seriously so that you can get the right part the first time. Let us know if anything is missing or if you have any questions.


Thank you! Your comment has been submitted successfully. You should be able to view your question/comment here within a few days.
Error submitting comment. Please try again momentarily.